PRINTMAKING
- Safety and Health
- BioSolut
- BioLac
- NEW! BIO-BASED HARD GROUND FOR ETCHING PLATES!
- NEW! AQUA-BLU HIGH QUALITY POSITIVE LITHO PLATES AT AFFORDABLE PRICES
Download SDS for Bio-Solut Download SDS for Bio-Lac Download SDS for Posi-Coat
SAFE, SIMPLE AND INEXPENSIVE ETCHING OF INTAGLIO PLATES IN SALT WATER ELECTROLYTE
By Dwight Pogue and Skip Klepacki
Copyright 2012
“’Salt-Water Etching’ has been used successfully for many decades in fine jewelry and knife making, printed circuit board manufacturing, and numerous other applications. By fine-tuning the practices and equipment for the intaglio application it is not only possible—but also simple and inexpensive—to consistently produce highest quality intaglio plates using a safe electrolyte of kosher or pickling salt dissolved in distilled water. Table salt, sea salt, or rock salt should be avoided because of incidental or added ingredients other than pure sodium chloride, and the same applies to distilled water versus tap water. This safe, simple and inexpensive electrolyte solution can be used to consistently etch many dozens of intaglio plates and then be easily replenished as detailed below.
PROCESS DESCRIPTION
Unlike the ‘bite’ created using an acid etching effect—such as with hazardous nitric acid or acid salts such as ferric chloride—Electrolytic Etching accomplishes its bite by the flow of electrons between the intaglio plate and a counter-electrode via a highly-conductive electrolyte, such as salt or copper sulfate dissolved in water. The DC voltage required in a 15% salt solution is very low—only 2-3 volts—the same as two D-cells in a flashlight. In fact, it is possible to etch exquisitely fine details using batteries as the only source of voltage and current, provided the batteries have enough charge capacity to etch the surface area of the image on the intaglio plate to the desired depth. It is important to maintain the voltage at or below 3 volts to prevent secondary electrolytic processes from occurring.
For larger plates—up to 16” x 20”—and for very consistent etching times, an inexpensive (under $40) 3-volt DC plug-in power supply is recommended. One significant advantage to electrolytic etching over acid or acid salt etching is that the etching process is driven entirely by the flow of electrons so that when the power supply is switched off, etching stops immediately. The use of timer switches such as those referenced below enables ‘set it and forget it’ etching control, allowing the printmaker to turn his or her attention to other tasks while the etching process is occuring. Equipment required for electrolytic etching is easy to make, improvise, or purchase by following the guidelines illustrated in the photos and captions below.”
We recently test-compared our salt etching with ferric chloride and found the results in the print to be indistinguishable. We used distilled water, mixed with kosher salt according to the photo- captions below, and kept the copper wire mesh, strap and hangers clean and without corrosion, which deters the etching process. We etch with 2 to 3 volts D.C. and make it a point to never go over 3 volts DC (direct current). We found our salt etching times were very comparable to ferric chloride – ten minutes in ferric was about 10 minutes in our salt etch. We recommend test plates be etched in your own salt etch to find best times for your particular set up.
We also tested the salt etch after approximately 30 copper test plates were etched in it. We compared identical copper plates, one etched in this well-used salt water mix and the other plate etched in a new, fresh mix of distilled water and salt. The results were nearly identical, which leads us to believe the salt etch can be used many times before being replaced with fresh water and salt.
WASTE DISPOSAL CONSIDERATION
An unavoidable consequence of the etching of any type of metal intaglio plate is the proper disposal of spent etching solution and sludge. The safe handling and disposal of electrolyte from Salt Water Etching is simpler and less hazardous than other etching solutions.
To clean the tank, first allow the water and salt to sit overnight so the copper residue settles to the bottom of the tank (see photo). Decant as much of the liquid as possible (carefully remove the clear salt and water in the tank without disturbing the bottom residue). The remaining sludge at the bottom of the tank consists of salts of copper. Strain the sludge through paper towels to remove the water and then dry the remains on newspaper so it can later be properly disposed.
As with any solution containing dissolved copper, disposal down the drain should be avoided, since copper ions in solutions are toxic to many aquatic organisms. We recommend testing your spent electrolyte using a simple and inexpensive pH test strip or kit made for testing swimming pool or spa water. If the test results prove to be acidic (below 7.0), the copper-containing solution or sludge can be brought to neutral pH by adding small amounts of common alkaline household products such as Baking Soda (Sodium Bicarbonate), Washing Soda (Sodium Carbonate), or TSP (Tri-Sodium Phosphate).
Wearing eye protection and gloves, add a small amount (teaspoon to tablespoon-sized) of the chosen neutralizer, stir thoroughly and re-test until pH test results are between 7 and 8.** The solution or sludge can then be further evaporated until dried or absorbed into kitty litter, double-bagged, and disposed according to local regulations. Small quantities of these copper-containing materials are acceptable in many municipal landfills. Check with your local landfill operator to be sure.
EQUIPMENT RECOMMENDATIONS
This is the link for the 3 volt Power Supply unit we chose:
HRP-100-3.3 Power Supply
We chose a 30 amp power source so it would be sufficient to etch a 16 by 20 inch plate (the more surface area to be etched, the more amps are needed). Note: The unit has a small plastic screw adjustment to decrease or increase the voltage slightly, and so we turned it all the way to the left to decrease it as much as possible, which our voltmeter registered at 3 volts.
This website features a timer switch for the DC power supply for $38:
LEVITON Timer, 120V, 15A, Digital, Table Top Remote
It also has a remote override.
Another time switch for $33. But with no override:
TORK Timer, Digital, 1000W, 18InCord, 2Recep, GY
A little panel-mount voltmeter for $5:
Analog Panel Meter - 0 to 5 VDC
A DC ammeter for $7:
85C1 DC 0-15A Rectangle Analog Panel Ammeter Gauge
It would be an advantage to have both meters (volts and amps), especially if etching larger plates. Monitoring the voltage and amps during etching of various sizes plates will help maintain consistency in the process.
We recommend copper mesh – or better yet, perforated copper sheet – as a counter-electrode instead of plain sheet or plate because the many and myriad edges will result in a uniform etch across the entire surface of the intaglio plate. Separation between the counter-electrode and the plate should be uniform from corner to corner and be in the range of 2-3 inches. Copper wire mesh or perforated copper sheets may be purchased from McMaster and Carr. Their website for mesh is: http://www.mcmaster.com/#copper-mesh/=3mxy. For our tanks, we purchased a sheet of wire mesh large enough so that we could bend the edges in order to make the sheet rigid and make it fit snugly within the tank. We selected 4 mesh (.020) copper wire, however, a sheet of perforated copper would be preferable since it is already rigid. The wire mesh we used was large enough so when the edges were folded over to make it rigid, the piece measured 17 inches high by 20.5 inches wide. It is important to maintain a uniform distance between whatever sheet you select and the copper plates you are actually etching – therefore, rigidity is preferred.
Grounds used for electrolytic etching should be selected to provide an effective barrier to electron flow, otherwise foul bite might occur at longer etching times if the ground breaks down during the etching process. Many conventional grounds such as acrylic wax, tape and nail polish, are effective barriers. D & S Posi-Coat and Bio-Laq are particularly effective and provide a rich palette of ink tones to the printmaker. We add a few drops of food coloring to the Bio-Lac to make it easier to see when using it as a ground.
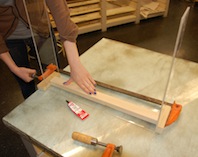 This is the second of two etching tanks we made out of clear Plexiglass. It is advisable to use at least one quarter inch thick Plexiglass or Lexan (stronger). We used a saw blade made for plastics. The size of our tanks are 18 by 22 inches by 4 inches wide, so that a 16 by 20 inch metal plate may be etched in them. |
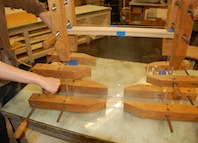 We recommend researching on line to find the appropriate glue. Solvent glue that is very thin (watery like) requires that the acrylic edges be perfectly smooth – cut with a router rather than a saw blade. Thicker glues (like gels) can be used for sawn edges if sufficient glue and clamping is employed. We used a tube of CLEAR MEDIUM BODIED SOLVENT CEMENT FOR JOINING ACRYLIC. In this photo, we are using a wood stick as a spacer for clamping the glued pieces together. |
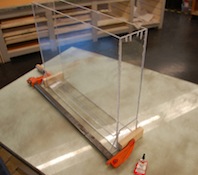 Note the strip of Plexiglass glued across the bottom of the tank to hold the copper wire mesh against the side of the tank when etching plates. Also note the cut outs on the top edges of the tank for holding the copper strap and the copper wire mesh. Both the copper wire mesh and the plate you are etching need to be aligned parallel to each other during etching, since an uneven etch might result if one end of the plate is further away from the wire screen than the other end. |
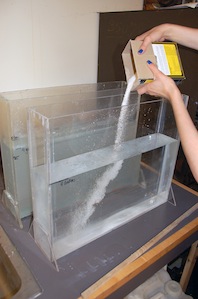 Pouring one and a half boxes of kosher salt (4 and one half pounds total) into four gallons of distilled water. |
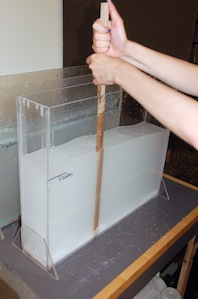 Stirring the salt into the distilled water. |
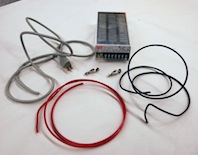 The 3 volt D.C. Power supply unit, a gray 110 volt three wire (white, black and green for ground) electrical cord with male plug, and two FINE STRAND wires, one red and one black rated at 30 amps (purchased from Home Depot). Two wire clamps were purchased at Radio Shack (We actually ended up using two heavier duty battery clamps from Radio Shack). We advise having an electrician attach the wires to the power supply terminals. |
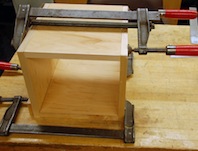 In order to provide a protective cabinet for the power unit, we built a simple, wooden plywood box 10 by 12 inches in size for containing/holding the power supply unit. |
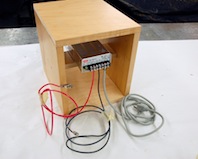 Using the two threaded holes provided in the bottom of the power supply unit, we bolted it securely to the wooden brace within the box. |
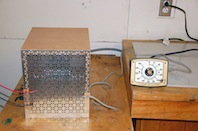 We used steeples (we recommend electrical insulated steeples) for holding the wires securely to the wooden box. We then cut two aluminum grills (from a hardware store) and screwed them securely to the box. The grills protect the wire connections to the power supply unit and allow sufficient air to flow through the box. Be careful that water never touches any part of the power unit or connections. When the unit is turned on, a small green L.E.D. light shines on the front of the power unit. The power unit is plugged into a timer, which in turn is plugged into an electrical outlet. As soon as the timer goes off, the electrolysis stops. |
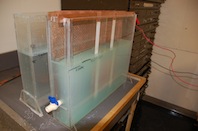 Etching a six by nine inch copper plate in the salt tank. Note: The positive clamp (red) clamps to the strap holding the plate to be etched, whereas the negative (black) wire clamps to the wire mesh screen. Note the spigot on the side of the tank for draining the clear water from the tank (after the tank sits overnight the water becomes clear except for the residue at the bottom). |
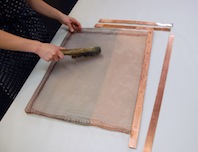 Before etching, always clean the wire mesh, strap and two hangers. Use a wire brush to clean the wire mesh and Norton polishing pads to clean the strap and hangers. An alternative is to soak the mesh in a tray of vinegar or water with citric crystals. Note that if the wire mesh and hangers are left in the salt water for any length of time, they will corrode and not perform properly. |
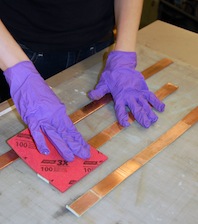 Cleaning the inside of the copper hanger straps with a few swipes of a Norton polishing pad. The back side of theses straps are covered with white plastic tape to protect them from the etch process. Any exposed front areas of the hangers are covered with clear packing tape, which is also used to tape the plate (to be etched) to the hangers. |
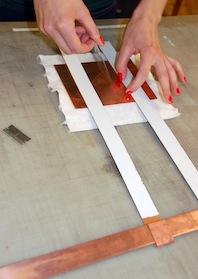 Using clear packing tape to secure the back of the plate (to be etched) to the two copper hangers. Packing tape works better than shelving paper. Remember, good contact and clean contact points are necessary for proper etching control. |
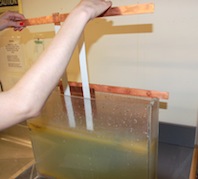 Placing the strap with the two hangers – and the attached copper plate to be etched - into the electrolysis tank for etching with 3 volts of DC current. |